⇒ DOWNLOAD THE TECHNICAL SHEET
⇒ DOWNLOAD THE PREVENTIVE MAINTENANCE MANUAL
Brand: SHIMADZU
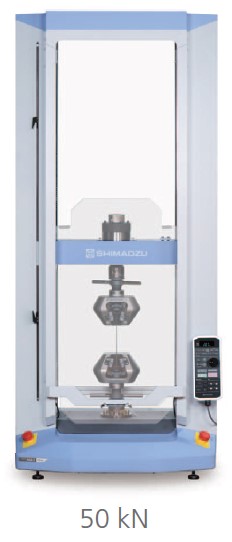
Code: AGS-50Knx (Autograph AGS-X Series)
Machine used to subject different materials to physical tests such as tensile and compression tests to measure the properties that these materials possess, The Shimadzu Autograph AGS-X series provides superior performance and practical testing solutions for a wide array of applications. Offering high-level control and intuitive operation, The AGS-X series sets a new standard for strength evaluations while providing the utmost in safety considerations in a modern, stylish design. The AGS-X comes standard with industry-leading TRAPEZIUM X data processing software. Offering comprehensive functions, TRAPEZIUM X offers an unparalleled level of operation. TRAPEZIUM LITE X, Shimadzu’s entry-level data processing software, provides enhanced productivity and efficiency for quality control operations.
Features:
Easy Control of Stress and Strain
Offers real-time auto tuning of control parameters, based on measured test force and strain data. Safely make comparisons to unknown sample data without the need for preliminary tests. In addition, the AUTOTUNING FUNCTION easily performs strain
control, an ISO 6892-2009 requirement.
Required Needs
IRON & STEEL
In addition to conventional stress control, tensile testing with strain control is increasingly in demand.
ISO 6892-2009 JIS Z2241-2010
PLASTICS & RESIN
Measuring the modulus of elasticity in the ultra-small strain domains proscribed by ISO and JIS standards has become a necessity.
ISO527, ISO178 JIS K7171
CERAMICS
Many samples are damaged by microscopic displacements, so accurate control is needed, right from the start of testing.
Achieve an Accurate S-S Curve with High-Precision Load Cells:
The wide, guaranteed load cell precision range of 1/500 to 1/1 improves testing efficiency and ensures that virtually all of your testing can be performed without switching the load cell or jig.
Furthermore, high-speed sampling of 1msec ensures no
missed strength changes.
Improved Safety
SAFETY FUNCTION / ONE-TOUCH STROKE LIMIT
The safety function stops the testing machine if force changes exceed a certain level during specimen setting or return. In addition, setting stroke limits is easy with one touch of the switch.
SAFETY COVER
Controls scattering of the test specimen during testing. The interlock improves safety: operators can open and close it easily
with the slide mechanism.
DUAL EMERGENCY-STOP SWITCHES
Features emergency-stop switches on both sides (20 kN–300 kN frame).
Includes:
AGS-50kNX STD Main Units with a Cover (English)
Load Cell Sets Class0.5 50kN
50k NUPPER JOINT FIX TYPE
50k NLOWER JOINT
TRAPEZIUM X Single English
Manual Wedge type Grip 50kN
DESK FOR AG-XD 20KN/50KN TABLE
Anti-topple attachment sets for AGS-XH Table Top type
Modular for easy expansion in the future.
Use in mono and bidirectional tests.
Change operation of different tests, either from tension to compression or vice versa without the need to change the heads.
Effective test or work width 600mm
Load frame stiffness: 120KN/mm
Measurement and control of the values of: Load, Travel and Deformation through software
Beam or bridge control: Simple control test, cyclic and manual control test.
Required Standard Functions:
Automatic reading of the characteristic values of the load cell
Force test on the screen
Tension tests, load on screen, position on screen
Automatic force test / load control (Autocontrol
Automatic effort control (Autocontrol)
USB-interface
Possibility of expanding the certified load to 1/1000
Operating application
(Fixing Main unit and desk)
Configuration and Accessories required:
Possibility of immediate issuance of reports of the tests carried out: Tension, Compression, Flexion, Cyclical
Data control and administration.
Allows to obtain, breaking point, modulus of elasticity, maximum load, minimum load
Clamp faces for planes of:
Tooth type about 0-7mm,
7-14mm tooth type flat jaw faces,
14-21mm tooth type flat jaw faces,
Jaw faces for round tooth type ± 04,-09 mm in diameter,
Jaw faces for round tooth type ± 9-14mm diameter,
Jaw faces for tooth-type rounds of ± 1421 mm diameter
Dubbing Test Set
Digital extensometer ± 050m-100mm
Universal Joint for ± 50KN Clamp
Spherical upper and lower plate for compression of ± 210 mm
± 50kN Tension/Compression Cell with connection cables, fixing screws, calibration cables, factory calibrated for ± 50kN
Class 0.5% Voltage
Compression 1/500.
Full Specifications
AGS-X Series Specifications
AGS-50kNX
50KN
50KN
Lineup of Models Differing by Load Cell Capacity 50 kN
Force Measurement
Accuracy High-Precision Type (1/500, ±0.5%), Within ±0.5% indicated test force (at 1/500 to 1/1 load cell rating), Conforms to EN 10002-2 Grade 0.5, ISO 7500-1 Class 0.5, BS 1610 Class 0.5, ASTM E4, and JIS B7721 Class 0.5. *1
Standard-Precision Type (1/500, ±1%):Within ±1% indicated test force (at 1/500 to 1/1 load cell rating). Conforms to EN 10002-2 Grade 1, ISO 7500-1 Class 1, BS 1610 Class 1, ASTM E4, and
JIS B7721 Class 1.
Calibration: Automatic test force calibration: select tensile, compression, or tensile and compression
Crosshead Speed Accuracy:±0.1%
Crosshead Speed and Permitted Test Force: To load cell capacity across entire speed range
Effective Test Width 425 mm
Crosshead Position Detection, Measurement Method: Optical encoder
Display Method: Digital display (display resolution: 0.001 mm)
Positional Accuracy: ±0.1% indicated value or ±0.01 mm, whichever is larger
Data Capture Rate: 1000 Hz max
Test Method Files: 40 files (PC link: 20 files, standalone controller: 20 files)
Standard Functions:
Automatic reading of cell characterstc values
Test force display, stress display, stroke display, position display
External analog output (2 channels)
External analog input (2 channels)
External digital input (2 channels)
Analog Recorder (option) output
Dataletty (opton) output
Automatic test force/stress control (Autotuning)
Automatic strain control (Autotuning)
Test Force auto-calibration
Break detection, auto return
Load cell overload detection
Touch-load detection function
Power Requirements: Single phase AC 200–230
50/60Hz 4.0kVA
Supply voltage fluctuations within ±10% of the set value.
D-class (100 Ω max.) grounding resistance.
Operating Environment: Temperature: 5 °C to 40 °C; Humidity: 20% to 80% (no condensation) Floor vibrations: frequency 10 Hz max., amplitude 5 μm max.
Within ±0.5% indicated test force (at 1/500 to 1/1 load cell rating)
Conforms to EN 10002-2 Grade 0.5, ISO 7500-1 Class 0.5, BS 1610 Class 0.5, ASTM E4, and JIS B7721 Class 0.5
Within ±1% indicated test force (at 1/500 to 1/1 load cell rating)
Conforms to EN 10002-2 Grade 1, ISO 7500-1 Class 1, BS 1610 Class 1, ASTM E4, and JIS B7721 Class 1.
Automatic test force calibration: select tensile, compression, or tensile and compression
0.001 to 800mm/min (stepless)
1100mm/min
±0.1%
To load cell capacity across entire speed range
1210mm
(745mm, MWG)
425mm
optical encoder
Digital display (display resolution: 0.001 mm) ±0.1% indicated value or ±0.01 mm, whichever is larger 1000 Hz max. *4
40 files (PC link: 20 files, standalone controller: 20 files)
Load Cell (with CAL cable), Power cable (5 m), turning rod, cable clamps, instruction manual
W718×D641×H1633mm
260kg
Single phase AC 200–230 V
50/60Hz 4.0kVA
D-class (100 Ω max.) grounding resistance.
Temperature: 5°C to 40°C; Humidity: 20% to 80% (no condensation)
Floor vibrations: frequency 10 Hz max., amplitude 5 μm max.




Valoraciones
No hay valoraciones aún.